Learn how to draw a cat in this fun cat drawing tutorial! But this is no ordinary cat – this is a Colorful Cosmic Cat!

If anyone ever told you that you shouldn't paint elephants pink or draw cows with purple stripes, then this drawing lesson is for you! Throw other people's rules out the window – let your imagination run wild!
I'll show you how I created this cute, cosmic cat with colorful, psychedelic designs. You can also use these ideas to create other funky animal portraits, like I did with myPunk Rock Puppies! (You can see one of them below right!) You can turn any animal into a Cosmic Creature – rhinos, kangaroos, horses, anything!
For this drawing lesson, I used: a pencil, a kneaded rubber (eraser), Prismacolor Colored Pencils (but you can also use markers, pens, or paint!), and drawing paper.
Ready to learn how to draw a cat?
Let's begin!
For a model, I used this cat photo that I took during my visit to Italy in the summer of 2010:

I cropped the photo to show a close-up of his face. I love the way he's staring straight into the camera!
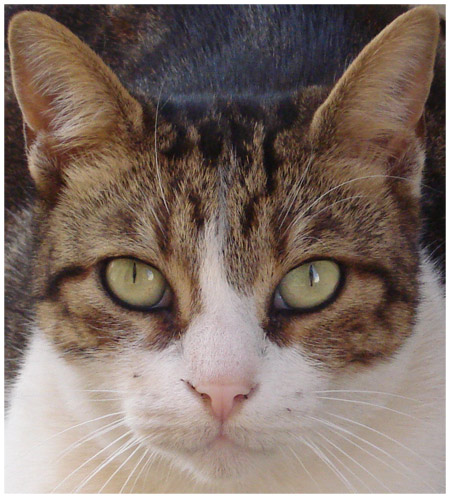
Next, I divided the picture into a simple grid by drawing a line in the middle of the picture both horizontally and vertically:

On my paper, I drew a similar grid:

To draw the grid, first I drew a rectangle on my paper that was 7 inches across and 7.75 inches tall. To draw the interior lines of the grid, I divided those measurements in half. Therefore, the vertical middle line was 3.5 inches in, and the horizontal middle line was 3 7/8 inches in.
Now, using the grid as a guideline, I drew the cat's face on my paper. The grid method makes it easier to draw accurately, instead of just eyeballing it. By using a grid to learn how to draw a cat, you can compare where the cat's features are in relation to the lines on the photo, and then draw them on your paper in relation to the lines on your grid.
Now, using the grid as a guideline, I drew the cat's face on my paper. The grid method makes it easier to draw accurately, instead of just eyeballing it. By using a grid to learn how to draw a cat, you can compare where the cat's features are in relation to the lines on the photo, and then draw them on your paper in relation to the lines on your grid.

For instance, look at the photo of the cat, and notice where his ears are. You can see that they are in the corners of the photo, but not quite touching the edge of the grid. So your job is to replicate that on your paper. Next look at how his chin is near the bottom edge of the photo, right in the middle of the central vertical line, and draw that on your paper. Draw lightly, so that you can erase any mistakes. (But more importantly, don't be afraid of making mistakes! No one gets it right on the first try. That's what erasers are for!)
Follow these same steps to draw the outline of the cat's head, as well as his eyes, ears, nose, and mouth. If you want, you can also draw outlines to signify the different patches of color on the cat's fur, like I did below:
Follow these same steps to draw the outline of the cat's head, as well as his eyes, ears, nose, and mouth. If you want, you can also draw outlines to signify the different patches of color on the cat's fur, like I did below:

Here comes the fun part: now you get to the color the cat however you want – using any designs, patterns and colors that you want! I'll show you how I drew mine, but feel free to follow your creative bliss and draw your cat in your own unique way.
First I outlined the cat's head and main features with violet:
First I outlined the cat's head and main features with violet:

Then I did something interesting. I put a sheet of blank paper over the drawing, and used a ballpoint pen to draw whiskers on the blank cover sheet, like so:

"Now why did she do that?" you may be asking. Let me share with you a cool colored pencil technique:
When you remove the cover sheet, your drawing paper will now be indented with the lines you drew on the cover sheet with the ball point pen. When you draw with your colored pencils over those indented lines, the indented lines will stay (mostly) white!
When you remove the cover sheet, your drawing paper will now be indented with the lines you drew on the cover sheet with the ball point pen. When you draw with your colored pencils over those indented lines, the indented lines will stay (mostly) white!

You'll notice that I drew the indentations over the purple outline, so there will be some purple in the whiskers. Why did I do that?
Well, I drew the purple outline first so that I could clearly see it through the other piece of paper that I placed on top of it - otherwise I wouldn't know where to draw the whiskers. So the part of the whiskers that go over the purple outline won't be white, but for all intents and purposes, I'm okay with that.
Next I colored in his eyes. I drew sort of a multicolored striped pattern, but you can color your cat's eyes any way you want! You can make them a single color, or a few colors, or draw polka dots or hearts! Up to you!
Well, I drew the purple outline first so that I could clearly see it through the other piece of paper that I placed on top of it - otherwise I wouldn't know where to draw the whiskers. So the part of the whiskers that go over the purple outline won't be white, but for all intents and purposes, I'm okay with that.
Next I colored in his eyes. I drew sort of a multicolored striped pattern, but you can color your cat's eyes any way you want! You can make them a single color, or a few colors, or draw polka dots or hearts! Up to you!
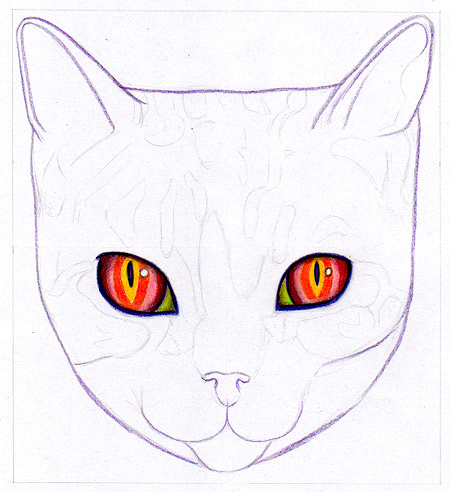
Then I started working on the cat's ears:

Again, you can draw any design you want! I finished out the cat's ears:

Then I moved on to his fur. I looked at the cat photo and picked out the darkest areas of fur and in my picture I drew those areas in red with white polka dots:

Next I drew several orange circles inside circles (kind of like a target shape) in between several of the red areas:

Then I drew yellow circles around the orange circles:

The next step was to fill in the rest of the blank areas at the top of the cat's head. I chose to color in those areas with light blue, and use a darker blue to add some short "fur" lines.

Next I filled in the middle part of the cat's face with greens and yellows, along with some darker green fur lines. I also went back and added some dark blue fur lines into the red spots, to help give the cat's fur more texture.

Then I finished the cat by coloring in the bottom half of his face with soft pinks, lavenders and blues.
Remembers those whisker indentations I drew earlier? In the photo below, you can see that those indentations stayed white, even though I colored over them:
Remembers those whisker indentations I drew earlier? In the photo below, you can see that those indentations stayed white, even though I colored over them:

You can also see that I added light blue lines underneath the indentations to accent the whiskers, to make them more visible. In the photo below, compare the accented whiskers with the blank whiskers and you'll see what I mean:

And here is the finished drawing!!

Pretty cosmic, eh?
Now you know how to draw a cat that is unique and colorful!
To recap, here is a quick visual overview of the steps on how to draw a cat that looks cosmic and psychedelic:

As I said earlier, this is just one way of how to draw a cat. Based on these steps, you can figure out how to draw a cat and color him or her in your own fantastically original way!
To show you just a tiny sliver of the all infinite ways you can color your cat, here are some different cosmic cat drawings:
To show you just a tiny sliver of the all infinite ways you can color your cat, here are some different cosmic cat drawings:

If you want to jump right in with coloring a cat without first learning how to draw a cat, here's a free blank cat outline that you can download, print and color:

Click to view full-size
Just click on the image to open up a bigger, printable version. Right-click on the bigger image, save it to your hard drive, and print it as many times as you want. I made the outline a light grey so that you can easily draw over it with colored pencils, markers or pens.
I hope you had fun with this drawing lesson on how to draw a cat!
I hope you had fun with this drawing lesson on how to draw a cat!


