Saturday, 5 December 2015
Monday, 16 November 2015
How to Draw a Rose
Learn how to draw a rose! This drawing lesson will walk you step by step through the drawing techniques you will need to create your own rose pencil drawings.
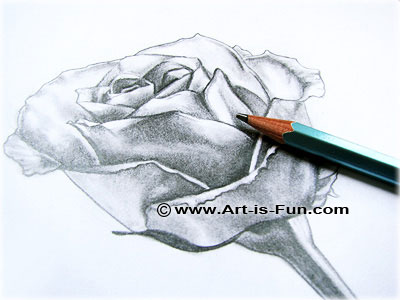
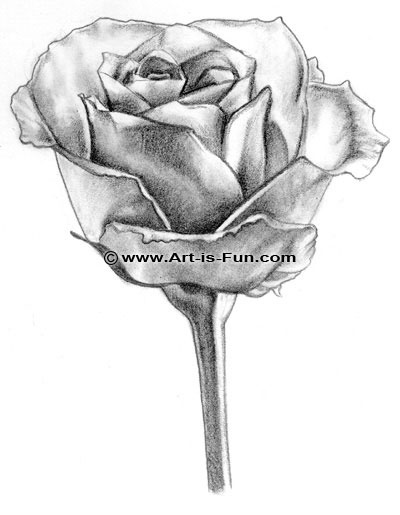
In this lesson, I'll show you how I made the rose drawing above.
To create this flower drawing, I used ordinary materials that you will find around your house. I didn't want to use any fancy art materials, because I wanted to create a drawing tutorial that absolutely anyone can try - you can try it right now, if you want!
Let's get started!
Drawing supplies for how to draw a rose:
- a regular HB pencil (HB stands for the hardness of the lead. Most pencils sold in stores for general writing purposes are HB.)
- a kneaded rubber, which is a type of artist's eraser - but you can use any type of eraser
- a pencil sharpener
- a Q-tip (also known as a cotton bud)
- white paper (but you can use any color paper you want!)
- a photo of a rose (you can also look at a real rose if you want)


Here is the beautiful rose photo that I used as a reference for this drawing. This lovely rose photo was taken byTambako and is used here with his permission for teaching you how to draw a rose!
One of the best things about learning how to draw a rose is that you don't need to worry about getting everything in exact proportion. If you draw a petal too large or too small, who's gonna know? So don't worry about drawing everything to perfectly match the photo. Just relax and enjoy the drawing process!
If perchance you do want to get the drawing absolutely perfect, you can use image transfer techniques such as transfer paper, the grid method, or use an art projector if you want to make a really big drawing.
Make sure that you start out small when you draw the inner petals, so that by the time you draw the outer petals, they're not falling off the page!
Here's an example of what you should look for in terms of identifying the center of the rose:
One of the best things about learning how to draw a rose is that you don't need to worry about getting everything in exact proportion. If you draw a petal too large or too small, who's gonna know? So don't worry about drawing everything to perfectly match the photo. Just relax and enjoy the drawing process!
If perchance you do want to get the drawing absolutely perfect, you can use image transfer techniques such as transfer paper, the grid method, or use an art projector if you want to make a really big drawing.
Start Drawing in the Center
I find that it's easiest the way to get started with a rose drawing is to identify the center of the rose. Find the innermost petal, and start your drawing there. Be sure to start drawing in the center of your paper, because you will be working outwards.Make sure that you start out small when you draw the inner petals, so that by the time you draw the outer petals, they're not falling off the page!
Here's an example of what you should look for in terms of identifying the center of the rose:

The arrows point to the innermost petal, which is where I started my drawing.
Draw one petal at a time, checking where they are in relation to one another. Don't worry about adding shadows at this point. The main thing is to draw a light pencil outline of the entire flower.
Be sure to use a light touch, because that makes it easier to erase if you need to make changes.
You will draw something like this:

Once you've drawn the entire outline of the rose, you are ready to start shading. Again, I find it easier to keep track of "where I'm at" in the drawing if I start with the innermost petal and work my way outwards.
There are two ways you can go about shading:
There are two ways you can go about shading:
- Dark to light: Identify the areas that are darkest, and shade them in first, gradually working towards the lighter sections.
- Light to dark: Start with the light areas, and shade them in gently. Gradually increase your pencil pressure as you move towards the darker areas.

Continue with the shading, working your way around the flower. I worked in a spiral motion, circling outwards from the center.

Once you've shaded an entire area, you can rub the graphite with your Q-tip. This will blend the graphite, softening the pencil markings, making the surface look smooth. This is a great technique to use for flowers to achieve that soft, delicate feeling.
Check out the picture below to see what I mean!
You can use Q-tips as a good DIY solution to blending. If you want to get serious about drawing, you can buy something called a stump (right) or a tortillon (below) from an art supply shop.
Stumps and tortillons are basically made from a sheet of tightly rolled paper that is soft and sharpened to a point at one end. Because of this point, they allow for more precision and control for blending than a Q-tip does.

Continue adding shadows and softening them with the Q-tip. You can also use your eraser to lift some of the graphite off of the paper, which will lighten the areas that you may have overdarkened.
In the picture below, you can see how some of the areas are smoothly blended with a Q-tip, while other areas have quick pencil shading. This shows you how the drawing starts off as a building process of laying down graphite.
After you run the Q-tip over an area, you will find that some of the darker spots will have been lightened, because the graphite was lifted off on the Q-tip.
To make those areas dark again, just go back and make some dark pencil marks there.

Carry on in this manner until the drawing is finished!
Tip: When you are shading, it doesn't matter if the tip of the pencil has gone dull. In fact, when you are shading it is better to use a pencil that is dull rather than sharp, because this makes for easier coverage.
Tip: When you are shading, it doesn't matter if the tip of the pencil has gone dull. In fact, when you are shading it is better to use a pencil that is dull rather than sharp, because this makes for easier coverage.
To recap, there are 4 main techniques at work to create this rose drawing:
- Sketching the outline of the rose
- Building and layering - adding shadows
- Smoothing and blending with a Q-tip
- Lifting off any areas that are too dark with an eraser
Voila! The finished rose drawing!
Please note that your rose pencil drawing can get easily smudged at this point, so try to keep it in a protected place. If you'd like to keep it for awhile, spray it with a final sealant. This will prevent smudging and fading. It will also protect the drawing from UV rays and moisture. The sealant that I use for my drawings is called Krylon Crystal Clear.
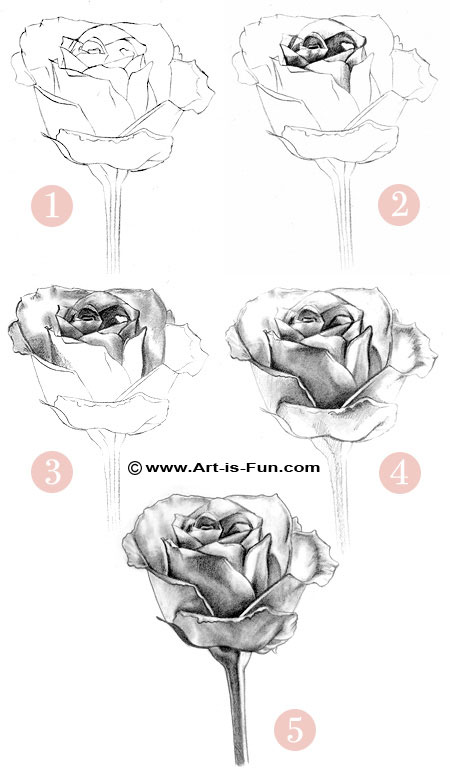
Here is a quick re-cap of all the steps on how to draw a rose:
how to draw an owl
Learn how to draw an owl that is cute, colorful, and beaming with personality!
In this step-by-step drawing lesson, I'll show you how to draw a whimsical owl that you can decorate with bright colors and patterns. Owls are fun to draw because of their wide eyes and fabulous feathers. They look great when you fill them with detail.
You can really have a lot of fun with this lesson and use different colors and designs each time when decorating the owl's wings, head, eyes and body. The possibilities are endless!
This lesson is an excerpt from Draw Groovy, my 64-page book containing easy step-by-step lessons on how to draw cute, whimsical images decorated with fun patterns and colorful designs.
Draw Groovy is available on Amazon, Book Depository, Barnes & Noble, and other fine booksellers!
Draw Groovy is available on Amazon, Book Depository, Barnes & Noble, and other fine booksellers!
Materials:
You can use any medium you want: pencil, colored pencils, markers, crayons, pens, gel pens - whatever you have on hand!You can draw your owls on any type of paper, such as drawing paper, printer paper, cardstock, colored paper, etc. You can also draw your owl on canvas and paint in the details!
Ready? Come along and learn how to draw an owl!
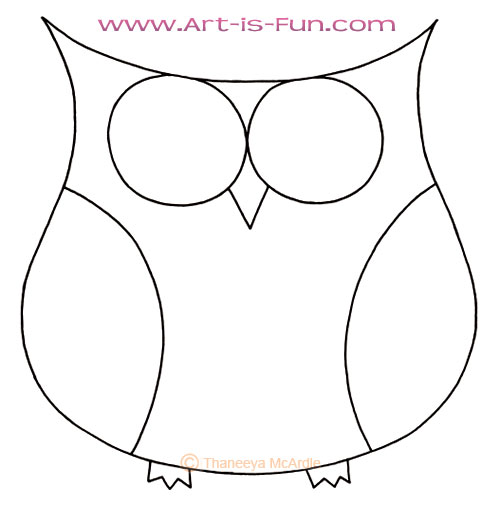
How to Draw an Owl
Step 1
At the top of your paper, draw a gently curving line that goes from left to right.

Step 2
Below the curved line, draw 2 large circles in the center for the owl's eyes. In between the owl's eyes, draw a 'v' for a beak.
Step 3
Draw a gently curving line for the body, kind of like a U-shape that tapers at the top.

Step 4
Draw a pair of feet and 2 curved lines for wings.
Step 5
Now it's time to add groovy decorations!
Decorate the eyes and wings with shapes and patterns, like dots, flowers, waves, etc.

Step 6
Add more decorations to the owl's body. Let your imagination run wild!

Step 7
Color it in!

Other examples
Here are a bunch of other examples of how you can create the same basic owl outline, and then fill your owl with different shapes, patterns and colors. Each owl is unique!The owls below were created with a variety of media, including: markers, colored pencils, pens, crayons and oil pastels. As you can see, the two bottom ones were drawn on colored paper, so in some places I let the color of the paper show through as part of the owl.

If you want some help and inspiration with drawing patterns, check out my lesson onHow to Draw Patterns!
This lesson is provided for educational purposes only. Please don't copy my owls exactly and try to sell them as your own, because that would be copyright infringement. Copying for purely educational purposes is okay, as long as I am properly credited as the original artist if you want to post the image online.
Follow this lesson to create an owl with your own unique combination of colors and designs, that suits your style and personality. Make it your own!
Follow this lesson to create an owl with your own unique combination of colors and designs, that suits your style and personality. Make it your own!
Recap: How to Draw an Owl
To refresh your memory, here are all the steps to drawing these cute owls:

I hope you enjoyed this step-by-step lesson on learning how to draw an owl!
How to Draw a Marble
Learn how to draw a marble in this free drawing lesson!

In this drawing art lesson, I'll walk you through step-by-step instructions on how to create a realistic drawing of a marble in colored pencils, just like this one:
Marbles are fun subjects to paint and draw. (If you look on my photorealism art page, you'll see that I love to draw and paint marbles!) The translucency and luminescence of these tiny, shiny objects are alluring as the light shines through them and creates interesting reflections. Plus, when drawing marbles you get to work with a lovely balance of sharp details along with relatively wider areas of color.
Since marbles are quite small, they work well for an introductory Photorealism Drawing Lesson that will help you prepare to draw larger, more detailed things. In this free art lesson, you'll learn how to:

- Make your own transfer paper
- Transfer an image to create a photorealistic colored pencil drawing
- Build and blend layers of colored pencils to create a sense of depth and realism
- Achieve a sense of luminosity and translucency with colored pencils
Let's begin!
Here are the drawing supplies you will need for this free realistic drawing art lesson:

- Paper – I used Strathmore ArtAgain drawing paper - my all-time favorite drawing paper when working in colored pencils. The texture and weight of this paper are perfect for drawing with colored pencils – and it is acid-free.
- Drawing Board – I use a Hardboard Panel as a drawing board, because they are perfectly smooth, sturdy, and very cheap.
- Tape – You'll need tape to adhere the drawing paper to the drawing board, and also to stick the print-out to the board for the first few drawing steps. As you can see from the photos, I used regular old Scotch tape. Now, this will be a case of "Do as I say and not as I do", because using regular Scotch tape is a big no-no if conservation and longevity are important to you. You really should use painter's tape to adhere your drawings to your drawing board, because regular Scotch tape is full of acids that will turn your drawing yellow over time. Masking tape will have the same effect, so stay away from masking tape also. An archival artist tape, on the other hand, will not cause yellowing – plus it's usually easy to remove and leaves behind no residue. But, since the tape will only be touching the drawing for a few hours in this case, and since I don't have any artist tape on hand, I'll let it slide… but only this time!
- 2B pencil – I used a sharp 2B pencil to trace the drawing. You can also use a mechanical pencil for this, which is actually preferable because it retains a sharp point.
- 6B or 8B pencil – To make your own transfer paper, you'll need a soft 6B or 8B pencil.
- Print-out of marble photo – Download the photo below and print it out on regular printer paper. Make sure to use regular printer paper and not something heavy like card stock.
- Scissors – You'll need scissors to cut both the photo and the drawing paper to size.
- Ruler – You'll use a ruler to measure out the size of the drawing on your drawing paper.
- Pencil Sharpener – Keep a pencil sharpener on hand. When working in photorealism on such a small scale, you'll need to keep your pencils nice and sharp.
- Kneaded Rubber – A kneaded rubber is a moldable eraser that is handy for erasing mistakes of all sizes.


And of course…
COLORED PENCILS!! – I prefer Prismacolor Colored Pencils over every other brand, because they are highly-pigmented, lightfast, and professional quality. Basically, if you want to draw photorealistically in colored pencils, then the quality of the colored pencils matter a great deal. Lesser-quality colored pencils will yield less-great results, even if your drawing skills are superb. So I wholeheartedly recommend Prismacolors for anyone who is serious about their drawings.
I have the whole set of 132 Prismacolor Colored Pencils – and that means a lot of colors to choose from! For this drawing lesson, I picked through my set to find the relevant colors and narrowed them down to these:

Don't worry, you won't need to buy all them though! I just find that before starting a drawing, it helps to separate the colors you might possibly need from the ones youdefinitely won't need, to reduce both the visual and physical clutter of your workspace.
These are the colors I actually ended up using:
These are the colors I actually ended up using:
- White
- Scarlet Lake
- Blue Slate
- Black
- Tuscan Red
- Mediterranean Blue
- Cool Grey 10%
- Poppy Red
- Cloud Blue
- Cool Grey 90%
- Light Green
- Non-Photo Blue
- Warm Grey 30%
- Jade Green
- Denim Blue
- French Grey 50%
- Celadon Green
- Violet Blue
- French Grey 70%
- Light Aqua
If you don't have all of them, you can buy Prismacolor colored pencils individually from Blick, or you can get creative and mix the colors you do have to create an approximate match.
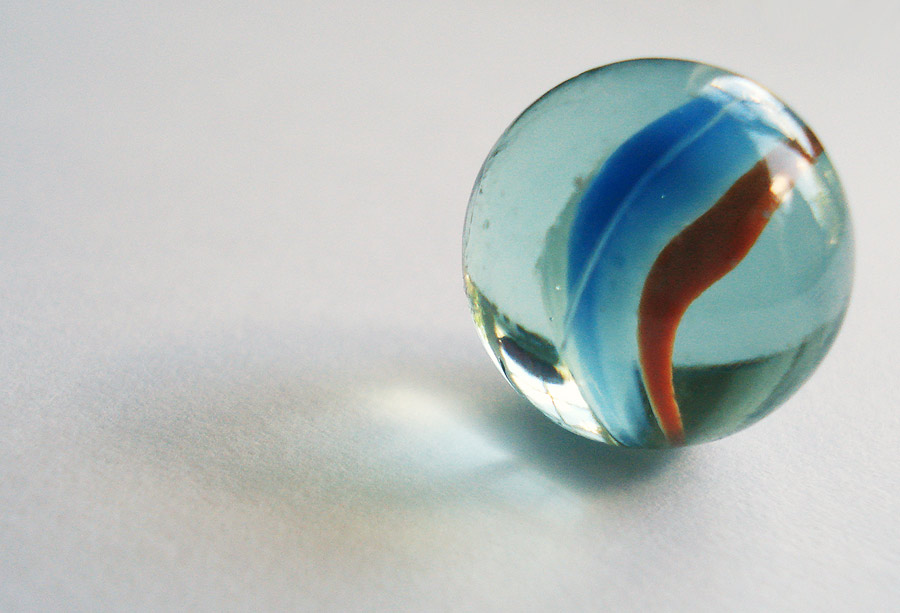
Here is the photo we'll be working from (above). Click the image above and it will open in a new tab or window. You can then right-click and save it onto your computer, and then print it out. It should print out at 2 inches by 3 inches. Cut the image to size, so that the piece of paper is 2" x 3".
Flip the paper over. Using your 6B or 8B pencil, scribble all over the back of the paper. Make sure the entire back of the paper is covered with pencil, like so:
Flip the paper over. Using your 6B or 8B pencil, scribble all over the back of the paper. Make sure the entire back of the paper is covered with pencil, like so:

Now, measure out a 2" x 3" rectangle on your drawing paper. Allow a half-inch to 1-inch margin on all four sides, creating a border around the rectangle, and cut the paper to size, like you see below.
Place the print-out of the marble photo inside the 2" x 3" rectangle. Use archival artist tape to tape the print-out securely onto the paper and also to tape the drawing paper securely onto the drawing board.

Using a sharp 2B pencil or mechanical pencil, trace the outline of the marble. You need to trace the outline, and all of the details such as different colors, highlights and shadows. Look at my tracing below to see how much detail I traced:

Be extra careful with tracing the marble, because the marble needs to be perfectly round to create a believable photorealistic drawing.
When you are done tracing the image, carefully lift up the print-out to see how the outline looks. Leave at least one edge still taped down, so that you can replace the print-out exactly where it was if you discover that you missed a spot.
If it all looks good, remove the print-out.
When you are done tracing the image, carefully lift up the print-out to see how the outline looks. Leave at least one edge still taped down, so that you can replace the print-out exactly where it was if you discover that you missed a spot.
If it all looks good, remove the print-out.

Here's what your drawing space should look like now:
(It's a good idea to tape down your paper so that it doesn't accidentally move and cause mistakes.)
(It's a good idea to tape down your paper so that it doesn't accidentally move and cause mistakes.)

When you work on your photorealistic colored pencil drawing, keep the digital image of the marble on your computer screen so that you can look at it as you draw. Also keep the print-out handy so you can reference it as well.

Above you can see what my work space looked like as I created this photorealistic colored pencil drawing.
It's important to keep your kneaded rubber on hand because sometimes you will need to lightly erase the graphite below drawing with your colored pencils. If you draw over the graphite with your colored pencils, you may inadvertently "set" the graphite into the paper, making it impossible to erase.
It's important to keep your kneaded rubber on hand because sometimes you will need to lightly erase the graphite below drawing with your colored pencils. If you draw over the graphite with your colored pencils, you may inadvertently "set" the graphite into the paper, making it impossible to erase.

When working on a colored pencil drawing, I generally always start with the lights or the darks. In this drawing, I chose to start with the lights.
Identify the light and white spots in the photo and use a gentle, light pressure to draw in the areas of lightness. It doesn’t matter if the area isn't "pure" white – look for areas that are "generally light" and gently color them in with White. Working with colored pencils is a layering process, so you will draw other colors over the "generally light" areas later.
Identify the light and white spots in the photo and use a gentle, light pressure to draw in the areas of lightness. It doesn’t matter if the area isn't "pure" white – look for areas that are "generally light" and gently color them in with White. Working with colored pencils is a layering process, so you will draw other colors over the "generally light" areas later.

Use Denim Blue to lightly color in the diagonal blue strip in the marble. Remember to use a gentle touch!

I tape a small piece of scrap paper to my drawing board so that I can test out colors. Many Prismacolor colors look alike, so sometimes you'll need to test them to see the subtle differences and decide which one to use.

Use Scarlet Lake for the diagonal red strip that runs parallel to the blue strip.

Layer Tuscan Red over the upper edge of the Scarlet Lake to make that part of the red strip darker.
Add Blue Slate on either side of marble as shown, and also a little bit in the marble's shadow.
Remember: if the exact color you need is not available or doesn't jump out at you, you'll need to draw several layers to create the color you need.

Identify the darkest areas and draw them in with Cool Grey 90%. Be careful when you apply dark colors, because they are hard to erase. Add them lightly.

Add more to the marble's shadow with Warm Grey 30%.

Jade Green is an important color for creating the sense of translucency in the marble. Add a touch of Jade Green to the top, right bottom and left bottom of the marble, as shown.

Add more Denim Blue to the diagonal stripe in the middle of the marble.

Layer Non-Photo Blue over parts of the Denim Blue in the marble's diagonal stripe.

Add a touch of Mediterranean Blue to the diagonal stripe, to create more of a transition from lights to darks.

Cloud Blue adds luminosity to the marble. You might need to start pressing a bit harder at this stage, since by now you have worked up several layers of colored pencil.
Add Cloud Blue to the skinny diagonal highlight that is inside the marble's diagonal blue stripe. For now, we can consider that diagonal blue area done.
Also add Cloud Blue to the marble's other light areas.

Deepen the color of the red diagonal stripe by adding Tuscan Red.

Make the red diagonal stripe more vibrant by layering it with Scarlet Lake.

Add white to the lightest areas of the red stripe to create highlights.

Use Poppy Red for the final touch-ups in the diagonal red stripe. The diagonal red stripe is now done!

Add Light Green to the left and right sides of the marble to create a sense of translucency.

Use French Grey 70% to bring out the darker areas in the marble, as well as in the shadow. Don't worry if it seems too dark in some places – we'll lighten it up and smooth it out in the next step.

Apply Celadon Green over the French Grey 30% that you applied in the previous step in both the marble and the marble's shadow.

Apply White over the Celadon Green. The Celadon Green created more depth, so adding the White will bring back more of the translucency. Be sure to add White on the bottom left part of the marble.
By now, the surface of the paper feels slicker. All these layers of colored pencil have made the paper have less "tooth". You'll need to press harder, but be careful not to press too hard.
By now, the surface of the paper feels slicker. All these layers of colored pencil have made the paper have less "tooth". You'll need to press harder, but be careful not to press too hard.

Add a hint of Light Aqua on the top and right of the marble. See how it's making the marble look even more round and solid?

Apply Cool Grey 90% to the shadow and the marble's darker spots. After that, go over the same areas where you applied the Cool Grey 90% with another light coat of Celadon Green, which will blend the Cool Grey 90% more smoothly with the rest of the marble.
Congratulations: Now the marble is done! Time to finish the shadow:

Add Warm Grey 30% to the marble's shadow.

Use Cool Grey 10% to temporarily lighten the shadow. Adding Cool Grey 10% will essentially bring out some subtle highlights in the shadow.

Now go over the shadow with another layer of Warm Grey 30%, but leave some of the lighter areas in the shadow still showing.
Also, use Blue Slate to add a touch of the marble's color to the marble.

Use French Grey 50% to add more of a warm darkness to the shadow.

Use Warm Grey 30% to gently lighten the areas in the shadow that were too dark, and to darken the areas that are too light. In other words, you'll use Warm Grey 30% to make the shadow appear more balanced, while still retaining some variance with lights and darks within the shadow itself.

Congratulations!! You've just drawn a photorealistic marble in colored pencil!
Here's the finished drawing:

I used French Grey 50% to sign the drawing. To keep the signature legible, I re-sharpened the colored pencil after every few letters.

I hope this realistic drawing art lesson was helpful to you. Let it serve as a guide that helps you along as you explore what you can do with colored pencils.
As you get more comfortable drawing with colored pencils, you'll surely come up with your own way of tackling drawings, from deciding where to start first to which colors to layer and when. There's no set formula for success when it comes to drawing photorealistically with colored pencils.
The more you work with colored pencils, the more you'll learn to do what feels right for each drawing.
Have fun!
Subscribe to:
Comments (Atom)